Makin’ Magic with Makey Makey

tpack.png

The quote above, from Matt Koehler and Punya Mishra’a (2008) speech about teaching creatively, deeply resonated with me this week as I began to play with my Makey Makey kit.  As I learned last semester in CEP 810, there is no such thing as educational technology; there is just technology that has been adapted for use in the classroom.  The limit to TPACK (Technological Pedagogical and Content Knowledge) is our own imaginations.  As teachers, we should strive to teach students all of TPACK together and not design a lesson solely based on a flashy new tech tool.  As Mishra (2012) explains in Rethinking Technology & Creativity in the 21st Century: Crayons are the Future,simply teaching one specific tool “is too short-sighted, because those websites and software packages perpetually change” (p. 14).  The author recommends focusing “on what it is that we want our students to learn and how that learning is to happen” (Mishra, 2012, p. 14).

With this in mind, I knew I wanted to create something with the Makey Makey to help my students gain these deeper skills.  The problem was…I had no idea where to begin.

Phase I: Brainstorming

While exploring MakeyMakey.com, I found lots of great lesson plans such as this ELA Logic Puzzle and Spanish Lesson.  I really liked the idea of integrated Makey Makey with Scratch (a simple coding website) but I was unsure what to create.   I was still stumped for several days on what objects I would use or even what aspect of ELA I would focus on.

Weirdly enough, an idea came to me when my husband bumped into a desk and knocked some of my saved nostalgia items down.

7.jpg


One of the items knocked loose was a “wand” that I was given as part of the Harry Potter Symphony Orchestra concert that I went to in Grand Rapids in January.

My classroom is gamified; my theme is Harry Potter.  Upon seeing the wand again, I thought: wouldn’t it be cool if there was a way for students to control the computer with a wand instead of a mouse?  Immediately I thought about how I could connect the wand (with some tin foil) to the Makey Makey and program Scratch to make this idea a reality.

With the start of a project in mind, I began to play around with Makey Makey and Scratch.

Part II: Play

Even though I had no prior experience with coding, I decided to leap right into Scratch.  I’m not a big fan of reading instructions, so I just began fiddling around with some programming to see what would happen.  I played around by adding in code and watching a preview to see the effect.

Not surprisingly, I failed frequently.  My tests kept getting “stuck” because I was not adding in the right prompts to keep the action going.  My computer kept freezing up because I was adding too much code on one screen.  I had no idea what I was doing.

Since I’m a visual person, I went into Scratch and found some samples I could “see inside” of.   Here is a screenshot of a project created by cheeseoclock11:

samplecheese.png

From this person’s coding, I figured out how to use the “if….else” function and have the player of my final product be able to type in an answer to a question asked, and have a specific event occur as a result.  I also learned that the “show” and “hide” functions were necessary to have the “sprites” (avatars) I wanted on screen.

Five hours later, I created my first 15 seconds of functional code.  Woohoo!

samplecoding.png

Part III: Prototyping

Now that I knew the basics of Scratch, I knew it was time to focus on the content of my activity.  I noticed right away that one of the Sprites was a little wizard character:

wizard2

This led me to a thought: Since I have a wand, what if I created a game where the player was a Wizard on a heroic quest?  My classroom is gamified, so I decided I would make this activity a “Challenge” (extension activity) for students to complete to earn “XP” (experience points) as part of our class game.  I chose Animal Farm as my subject matter because that is one of the first units I’ll teach in the Fall.  I knew I wanted to implement the question/answer function I saw on Scratch, but knew I could not get too complex with the questions since if the player typed in an answer that was even one letter off, the game would end.  Therefore, I decided to stick with vocabulary definitions, using vocabulary in context using Animal Farm, and symbolism using items hooked up to the Makey Makey.

Since I spent five hours of play time hashing out problem areas, creating the prototype went pretty smoothly.  In another 2-3 hours, I had a functional 3-minute game.

ifthen.png
Creating the if…else functions was one of the most difficult aspects of coding.  I found the process to be like a simplified Choose Your Own Adventure (since if the player did not get the right answer, the game had to be restarted)

After the coding was complete, it was time to set up the Makey Makey.

3

My first step was to lay down a towel on my workspace.  I have cats, and I knew they would chew the cords if I left them out.  So, whenever I needed a break, I folded everything into the towel (kind of like a puzzle mat).

Then, I hooked up all of the objects that connected to symbolism in the Scratch activity.

2
From left to right: bacon (which represent the pigs.), a fork (which represents a pitchfork –> Farmer Jones) and the wand (used to “cast spells”)

The fork I used was just a regular fork from my silverware pile.  The bacon picture came from a box of bacon I made.


4
From left to right: Hillary pin (meant to symbolize the Democratic party, which is usually represented by a donkey)  and the Earth cord (which needs to touch the player to allow the Makey Makey to function.

I needed an object that represented a donkey since one of the clues in the Scratch game was about a character in Animal Farm named Benjamin (a donkey).  I knew a Hillary pin would be a logical connection to the Democratic Party, so I created my own based on a pin design I saw online.

I colored white paper with permanent marker and taped the design onto another pin I had to create the needed conductivity for the circuit.

After testing the game out a few times, and fixing some glitches, I deemed my prototype complete!

Below is a video showing how the video works from the student side of things. (Note: I started the video in the middle of the game and I muted the music that will usually start automatically so my commentary could be heard.)


Part IV: How-To Guide

If you are interested in using or remixing the Scratch video I created, click here.  Then, click the blue “see inside” button.  You’ll be able to see my programming and tweak it to suit your own project.

Here are the cords/controls I used in the project

  • Wand = Space bar
  • Up arrow = Fork
  • Down Arrow = Bacon
  • Left = Democratic Party Symbol (pin)
  • Earth cord

To hook up the Makey Makey, you will need to hook a wire from the kit from the correct spot on the Makey Makey using the alligator clip to the specific object you want.

1

Keep in mind that not all objects are conductive.  I had to put a piece of foil around the tip of the wand and a staple in the cardboard bacon picture to make sure the connection would work.

2

To turn on the Makey Makey, plug the USB cord into the computer and the other half of the cord into the top of the Makey Makey.

To create a connection, have the Earth cord make contact with your skin (by holding it) and then select the desired object when prompted in the game.

(Note: you can use Scratch without the objects/Makey Makey kit, but it is way less fun/hands-on!)

Part V: Reflection

I had so much failure with this project, especially early on in the brainstorming/coding phase.  Even though I spent several hours tweaking spots and working through trial-and-error, I never got extremely frustrated.   I was able to look at the problems logically and was able to find the problem quickly by looking at the spot where the program had stopped or was able to look at other Scratch projects that contained the same code I wanted to integrate into my own project (such as the if…else function).

If I were to assign Scratch to my students, I would make sure they had enough play time before assigning a project to them.  My playtime was invaluable to my own success.  If I was a student and had only a class period or two to integrate Scratch with content that shows my understanding of a class concept, I would have definitely been more frustrated/stressed throughout the whole process.  This will be a good lesson to keep in mind in the future if I end up assigning students a Scratch and/or Makey Makey activity.

References

BenSound. Epic. Retrieved from http://www.bensound.com/royalty-free-music/cinematic

Cheeseoclock11, . “Question game!!!.” Scratch, 21 Apr. 2015, https://scratch.mit.edu/projects/53767064/. Accessed 11 July 2017.

Graves, C. (n.d.). Makey Makey ELA Logic Puzzles Lesson Plan. In Makey Makey. Retrieved July 9, 2017, from http://makeymakey.com/lessons/logic-puzzles-lesson/

Graves, C. (n.d.). Makey Makey Spanish (Dual Language) Lesson Plan. In Makey Makey. Retrieved July 9, 2017, from http://makeymakey.com/lessons/spanish-lesson/

Hilary Pin (n.d.). In PinMart. Retrieved July 13, 2017

Koehler, M. J., & Mishra, P. (2008). Thinking creatively : Teachers as designers of technology, pedagogy & content. [Online video]. Retrieved from https://vimeo.com/39539571

Mishra, P., & The Deep-Play Research Group (2012). Rethinking Technology & Creativity in the 21st Century: Crayons are the Future. TechTrends, 56(5), 13-16.

Scaffolding Writing with Google Forms and autoCrat

Teachers solve many problems throughout the course of the day, but not all problems are created equal.  Some problems are well-structured (meaning there is one clear solution to the problem), ill-structured (meaning the solution is dependent on many different variables and may have a different solution depending on those variables) or even wicked (meaning the problem is almost unsolvable with no best solution).

As a secondary English teacher, the type of problem I face most often is ill-structured.  For example, I am working on integrating a choice reading program in my classroom.  This involves giving students 60+ minutes over the course of the week in class to read a book they want to read.  How to set up the blocks of reading time was an ill-structured problem.  Based on the variables (such as reading stamina and student attitude toward reading) I actually had two different solutions to the problem.  I gave my 8th-grade students 10-15 minutes of choice reading time at the start of the hour each day, while my 11th/12th-grade students used one full class period one day per week to read.  Both solutions worked, but only because I knew that the different classes needed different solutions to be successful.

black and-white, blackboard, business
Link to Public Domain Image


The most difficult ill-structured problem in my classroom involves writing.  Although many of my students struggle with writing, I have noticed that students with Attention Deficit Hyperactivity Disorder (ADHD) have an especially hard time.  This is backed up by research from Schacher, Logan, Wachsmuth, and Chajczyk (2017) who cite many additional researchers in their statement that children with ADHD “are more distractible (e.g., Ceci & Tishman, 1984) and impulsive (e.g., Campbell, 1974; Firestone & Martin, 1979) and, in particular, less able to sustain attention” compared to other children (Schacher, 2017, p. 362).

For those that struggle with writing, including students with ADHD, the following ill-structured problem arises: “How can I scaffold the writing process to help students succeed?”

desk, man, notebook
Link to Public Domain Image

Mayes and Calhoun (2007) give excellent intervention suggestions “to help students who have writing problems” which involve “providing class notes and outlines” allowing students to type “written assignments, and teaching structured writing strategies” (p. 481).  Color-coding materials and breaking long assignments into smaller chunks are two other common strategies.

With this in mind, I immediately thought of the Google add-on autoCrat.  This behind-the-scenes Sheets add-on uses student responses from Google Forms to create color-coded paragraphs.  I previously dabbled with autoCrat for CEP 810’s 21st-century lesson plan project.  In this assignment, one of the steps involved students filling out a Google form to create a Claim-Evidence-Reasoning (CER) paragraph based on the work of Mari Venturino.   I decided to adapt (or “remix” as we’d say in CEP 811!) this CER assignment into a full-blown essay template to scaffolding writing for high school students with ADHD (and for others that need the extra support).

Since some of the accommodations for students with ADHD involves giving students the ability to type, use an outline, and break writing projects into small chunks, I created three Google forms for the students to fill out: Header/Intro, Body Paragraph, and Conclusion.  Here is an example of text the students would fill out in the Body Paragraph document:

Body_Paragraph_Sample

As you can see, the Google Form serves as an outline because it breaks each of the paragraphs down into distinctive steps.  It also offers additional scaffolding with an explanation about what each part of the paragraph (such as the topic sentence) is and gives an example. (If you’re interested in your own copy of these Google Form templates, click the links here: Intro/Header, Body Paragraph, Conclusion.)

After students complete the Google Form, they will automatically receive an email with their color-coded Google Doc (thanks to the autoCrat add-on).

Here is an example of the email sent out:

email

Here are two examples of what the formatting looks like:

Intro_example
Sample Heading/Intro
bodyparagraphexample2
Sample Body Paragraph

Thanks to autoCrat, everything on the document (including the header and double spacing) has been automatically created and formatted based on templates I created on Google Docs (Intro/Header, Body Paragraph, Conclusion).  Since students with ADHD have difficulty with organization, this will be a tremendous help to them.  The color-coded text is another benefit because the students will have an easier time reading through their own writing to self-edit and will be able to identify if a section of their writing is lacking depth.

Overall, the combination of Google Forms and autoCrat is a powerful way to help any struggling writer, including students with ADHD, succeed.

Below is a video which shows the student-side of the process and the benefits of using these tools.  (Note: due to time constraints I did not go into how to set-up the technical side of autoCrat; for more details on this, check out Mari Ventuino’s screencast.)

References:

Mayes, D., & Calhoun, L. (2007). Learning, Attention, Writing, and Processing Speed in Typical Children and Children with ADHD, Autism, Anxiety, Depression, and Oppositional-Defiant Disorder. Child Neuropsychology, 13(6), 469–493.

Schachar, R., Logan, G., Wachsmuth, R., & Chajczyk, D. (1988). Attaining and maintaining preparation: A comparison of attention in hyperactive, normal, and disturbed control children. Journal of Abnormal Child Psychology, 16(4), 361-378. doi:http://dx.doi.org.proxy1.cl.msu.edu/10.1007/BF00914169

Smashboard CER

One of the greatest areas of weakness for my students is writing.  For them, writing is overwhelming; if they are presented an essay outright, many students simply shut down and refuse to do anything.


Image result for writing gif
Image Source


Therefore, for my lesson plan, I decided to use technology to scaffold the writing process for my 8th graders.  My lesson involves students answering an essential thematic question (Is Life Better With or Without Pain?) by connecting nonfiction to the class novel (The Giver) through the writing of a CER (Claim-Evidence-Reasoning).

Thomas and Brown (2011) state that “digital media [should provide] access to a rich source of information and play” (p. 37-38).  With this in mind, I decided to turn this assignment into a Smashboard (based on the work by Dee Lanier).

Smashboard2.0

Smashboards, which are like gamified Hyperdocs, combine many tech tools with the end goal of having students create something.  This fits perfectly with Renee Hobbs’ (2011) ideas of five communication competencies: Access, Analyze, Create, Reflect, and Act (p. 12).

In my lesson plan, students first Analyze their background knowledge by using Padlet to reflect on the Pros/Cons of living without pain.  At this point, students will most likely argue that life without pain is ideal.  However, once they watch a YouTube video or two (Access) about the true story of Gabby, a girl who experiences no pain, they will undergo a conceptual change and realize that pain can be a good thing.

Students will Reflect on this video by using RecapThat to process what Gabby’s life was like, and connect their ideas to the essential question, and make a connection to The Giver.

Q1Q2

Next comes the most important step: Create.  As explained in this blog post by Mari Venturino Google forms can be used to scaffold students’ CER writings!  Students insert their answers on a Google form (which is much less intimidating than staring at a blank Google Doc, wondering where to begin).  This form, by use of the Autocrat add-on, automatically converts into a google doc where students can revise their drafts and have students peer review their work.  Since the google doc color-codes each element of the CER, students will quickly be able to determine where information needs to be added to make their work stronger.

After self-editing, the students will post a draft of their writing to a discussion board on Schoology for peer revision.  After receiving feedback, and giving feedback to others, they can turn in their final draft on Schoology.

For students that want a challenge/extension, there is an additional assignment where students interview a community member and see his/her view’s on the thematic question (Act).

I’m excited to try this 21st Century Lesson with my students next year!

References

Hobbs, R. (2011). Digital and media literacy: Connecting culture and classroom. Thousand,

Oaks, CA: Corwin/Sage.

Thomas, D., & Brown, J. S. (2011). A new culture of learning: Cultivating the imagination

for a world of constant change. Lexington, Ky: CreateSpace?.

Wunderlist is Wonderful!

As a teacher, I have so much information running through my head on a constant basis that it is a wonder that I can stay focused and get anything done!


Image result for too many thoughts gif
Image Source


David Allen (2001) gives some advice on this by stating that we should get into the habit of writing things down when we have a thought so that we do not waste time and energy stressing about remembering to do something.  Allen’s (2001) first step in the Getting Things Done process is simply finding a place to collect information.

One way this information can be collected is a website called Wunderlist. com.  This website allows me to create different categories (such as work, school, etc) and create a to-do list for each list.  For example, here is my to-do list for the week:

RevisedWunderlist.png

There are many things I like about this tool.  I like that I can create separate lists because it allows me to focus on energy on a specific element of my life without being clogged down by the rest.  Being able to check things off the list (with a satisfying dinging noise) and seeing how many things I’ve already accomplished is very rewarding.

I also like that I can star specific tasks that are the most important for me to complete, set due dates, and even set a reminder!

Reminders.png

The only downside is sometimes I think of something I need to do when I am away from my computer.  Thankfully, however, there is a mobile app version of this tool, which is very convenient.

I can definitely see myself using this tool in the future to continue to hone my collection skills and improve my productivity!

References

Allen, D. (2001). Getting things done: The art of stress-free productivity. New York:

Penguin.


My PLN

3.1 Popplet.jpg

Professional Learning Networks (PLNs) are an essential part of any career.   You need other people, or groups, that you can rely on to get advice, learn new information, or just to vent.  It is especially important in education to help avoid the career-killing norm of teaching in isolation (“National Educational Technology Plan,” 2010, p. 39).

The image above, which I used Popplet to create, shows my PLN.  My PLN stretches from people I know and see every day (people at the school I teach at, River Valley) all the way to professional groups and organizations that I chat with online.

I am posting this on my blog to help conceptualize who is in my PLN, and how I can continue to expand it even more.  For example, with my Network Learning Project, I am working to expand my PLN with Twitter Chats! (Fun fact: as I write this post, I’m engaging in my third Twitter chat!)

Teaching is no longer an isolated venture.   Expert teachers are chatting and sharing ideas every day.  It is up to each of us as educators to find the right support group to help better ourselves and our craft.


Reference

Reimagining the Role of Technology in Education: 2017 National Education Technology

Plan Update (2017, January). In https://tech.ed.gov/files/2017/01/NETP17.pdf. Retrieved May 27, 2017.


Twitter Chat Challenge

Last week’s post was about resisting change.  In a similar vein, I’m going to be sharing something I have been avoiding for a long time….Twitter.

Image result for gif twitter
Picture Source

Yes, it’s true: I have been resisting Twitter for a long time now.  Originally, I just did not want to be bothered with having two social media accounts (since I use Facebook way too often anyway).  Passive resistance turned to outright detestation when I had to create a Twitter for an undergrad class (where we were forced to Tweet answers to assignments without a clear understanding of why this had to be done at all).

After I landed my first teaching job, I began going to Professional Development and began hearing ad nauseam how Twitter (especially Twitter Chats) are such a powerful tool for educators to connect with other educators.  By that point, however, I was too stuck in my ways to change my behavior.

My response to these suggestions?Image result for gif never

Picture Source

Fast forward to today.  I have yet again been asked to create a Twitter account for a college class.  The difference is, however, that this time I am willing to change my conceptual understanding of Twitter!

To help integrate myself into the Twitter world, I will be teaching myself how to effectively engage in Twitter Chats during CEP 810’s Networked Learning Project.  This assignment requires that I only use help forums and YouTube videos to teach myself.

Some specifics I’d like to learn are:

  • What are some common EDU chats?
  • What is the best way to manage the Twitter feed flow during a chat?
  • What are some common hashtags?
  • What is the proper etiquette/norms for a Twitter Chat?

Here are some resources I’ve found so far about this topic:

–This video recommends Tweet Deck or Tweet chat to organize flow

–This video explains how to use Tweet Deck

–Basics of a Twitter Chat

–Lists what twitter chats for teachers are available (link here)

–Educational hashtags explained

I am very excited to join some twitter chats and network with some new people!

Image result for gif twitter

Picture Source


Learning, Understanding, and Conceptual Change

In the first week of CEP 810, I have been asked to write an essay that explores my knowledge of learning, understanding, and conceptual change after reading Bransford, Brown, and Cocking’s (2000) How People Learn.  The full essay (754 words) can be found here.   To summarize, I discuss how views on learning have shifted over time.  I explain how learning can be created through people’s (sometimes inaccurate) personal experiences and transfer.  I also explore some best practices that develop learning such as conceptual change and metacognitive reflection activities.  Thank you for reading and any comments you may share!


Failure as Learning Mode: Final Project

Throughout the past several weeks, my group mates and I have been analyzing a very Wicked problem: How can Failure be as Powerful a Learning Mode as Success?  This is a very difficult question to answer since failure is usually viewed negatively.

Before thinking of solutions to our problem, we researched why students are afraid of failure and put our findings into infographics (like the one you see below).

Failure as a Learning Mode.png

Next, we put together surveys to see other educators’ perspectives on failure.  Click here to view the survey; look below for an infographic highlighting some of the results.

failure-as-a-le_23792777_d3dde0f7bd3c5dfa2911c5c956cd401691e09d99 (1).png

As you can see, most of the teachers stated that they valued failure in the classroom and recognized its importance for student learning, but did not think that students viewed failure the same way.

After analyzing this data, we began to brainstorm potential solutions to our Wicked problem.  After a long discussion, we decided the “best worst” solution to failure as a learning mode is to teach students grit and growth mindset (since our research showed that successful students have these two characteristics) and changing teaching practices to allow students to learn from their failures in a safe environment. We highlighted Project-Based Learning, Makerspaces, BreakoutEDU, and STEM as possible models that can be implemented in the classroom to promote failure.  Since all of these models involve students dealing with difficult challenges and potential failure, it is the perfect avenue to model growth mindset to students and share strategies for dealing with failure.

I am very proud of the efforts our group put into our final product.  Click here to see it for yourself!


References

Milton, A. (2017). Failure as a learning mode data?  Piktochart. Michigan State University.

Milton, A. (2017). Failure as a learning mode infographic.  Piktochart.  Michigan State University.

PQ + CQ Reflection

A common concern teachers have is figuring out how best to prepare students for future careers when it’s very unclear what these future careers will look like.  Thomas Friedman (2013) in a New York Times Op-Ed cautions that as we become more “hyperconnected” around the world via technology, more basic skills jobs will become outdated.  Students “will need to develop skills that are complementary to technology rather than ones that can be easily replaced by it” (Friedman, 2013, p. A7).  This means that in the classroom, teachers need to get away from having students memorize facts and instead focus on higher order thinking skills.

According to Friedman (2013) two of the skills students need to learn are passion quotient and curiosity quotient (p. A7).  This corresponds as well to Berger’s (2014) ideas that students need to be taught how to question.

Based on these ideas from Friedman (2013) and Berger (2014) I created an infographic showing my idea on how to bring these two skills into the classroom.

PQ+CQ Infographic.png

The infographic shows that in order for students to learn PQ and CQ, they need a teacher that brings passion and curiosity to the classroom to model these skills.  For example, in my classroom, I show my passion for literature with my 700+ book class library, the excitement I project whenever I talk about books, and an ever-growing list of novels I’ve read displayed in my classroom.

20170801_123529
Image from my classroom

Through talking about books with my students, I also model my curiosity.  When my students and I have class discussions, I ask many higher-order questions without specific answers in mind.  Usually, my students come up with ideas and make connections I never even considered.

Another way I model my curiosity to my students is through experimentation with different styles of teaching such as Project-Based Learning, Genius Hour, and the Flipped Classroom model.  I constantly tweak my lesson plans with many questions in mind, such as “what will be the most effective way to engage my students?”  After teaching in a new way, I ask my students for feedback so I can improve for next time.  All of these different modes of teaching allow students to be creative and ask questions, too.  For example, during Genius Hour my students have the chance to complete a project they are passionate about.  This leads to many questions for them such as “what am I passionate about?” or “how can I best convey my findings to others?”

All of these different modes of teaching allow students to be creative and ask questions, too.  For example, during Genius Hour my students have the chance to complete a project they are passionate about.  This leads to many questions for them such as “what am I passionate about?” or “how can I best convey my findings to others?”

I also integrate technology into these different teaching methodologies.  As Friedman (2013) mentions, it’s imperative that students are able to work alongside technology and not just create things that can be easily found online already (p. A7). Therefore I give my students free reign to sites like SparkNotes and Schmoop (that contain basic summaries of texts) with the expectation that their final product will show their application of knowledge, not just a basic understanding that can be found online. Since my school is 1:1, the students use technology as part of their projects to collaborate with group mates and display their knowledge.

It’s imperative for me as a teacher to continue to follow my passions and question critically, so that I can pass on these important skills to the next generation.

References

Berger, W. (2014). A more beautiful question: the power of inquiry to spark breakthrough ideas. New York: Bloomsbury.

Friedman, T. L. (2013, January 29). It’s the P.Q. and C.Q. as Much as I.Q. The New York Times, p. A7. Retrieved from http://www.nytimes.com/2013/01/30/opinion/friedman-its-pq-and-cq-as-much-as-iq.html

CEP 811 Final Reflection

Before taking CEP 811, I did not consider myself a “Maker.”  I viewed Makers as professional artists, creators, and inventors.  Thanks to this course, however, I realize that everyone (including myself) is a Maker!  For example, I create detailed lesson plans every day during the school year by remixing other’s ideas into my own creations.  I also learned that students need opportunities to be Makers as well since being involved with a Makerspace will increase students collaboration, cooperative problem solving, and critical thinking skills.  It’s essential to let students play, be creative, and prototype if they are to gain these important skills.

With this in mind, I plan on offering my students more opportunities to be Makers in my classroom.  For example, during week 4 of CEP 811, I created a Makerspace lesson for my English 12 class.  I plan on using my ideas in this lesson to create a Project-Based Learning (PBL) unit.  I have never implemented a PBL unit before, but I know giving students the freedom to take risks and figure things out for themselves will help them build valuable skills.

Another way I can integrate more Makerspace activities is during my school’s “ICE” time. ICE (which stands for Intervention, Collaboration, and Enrichment) is a 42-minute block on Tuesdays, Thursdays, and Fridays, where students can be assigned for additional help in a content area or attend enrichment sessions of their choice.  I plan on offering Maker enrichment sessions where the students are introduced to a new tech tool (like Makey Makey, Scratch, Piktochart, WeVideo, etc) and are given time to play and create something with the tool without any academic pressure.

To reflect on all of my Maker creations this week, I decided to create a Remix of all of the projects I created as part of CEP 811.  After all, just as we learned in the first week of CEP 811, everything is a remix!

Assessing Student Creativity

When I was taking a Communications course as part of my undergraduate studies, my professor gave my class an assignment: create a digital sandcastle.  The following class period, my classmates and I all presented our creations.  When I received my grade on this assignment I was shocked to learn it was a 0/10.  After talking to my tablemates, we quickly realized that we had all failed the assignment.    After letting us squirm for a few minutes, my professor explained that he was just testing us.  He wanted to teach us an important lesson: it was not the teacher’s role to judge a student’s creativity.  (As a result, he let us know we actually all earned 10/10 on the assignment).

sand-castle-1308921_640
Image Link

For many years this lesson stuck with me: I believed that assessing creativity was something that was not possible to assess, and even if it was, should not be attempted. My thoughts on grading creativity were altered when I read Grant Wiggins’ (2012) blog post “On assessing for creativity: yes you can, and yes you should.”  Wiggons (2012) states that “Educators sometimes say that they shy from assessing creative thought for fear of inhibiting students” which he considers a “grave error” as well as hypocritical since teachers also commonly grade subjective elements such as “‘effective communication’ and ‘collaboration.'”  I will admit that I was the type of teacher that Wiggins described: I thought it would be unfair to grade students on things like “engagement” so I settled for things that I could clearly see like having eye contact during a presentation.  Instead of focusing on such small elements, however, Wiggins (2012) argues that teachers should focus on the end-goal.  For example, if my goal is for students to have an engaging presentation, that should be the main objective stated on the rubric, not minor elements (like speaker volume and eye contact).

presentation-224107_640
Image Link

As a result of Wiggins’ (2012) post, my mindset on grading creativity has definitely shifted.  My goal is to begin assessing creativity.  For example, an issue I had last year when my 8th-grade students were presenting speeches was that the speeches were all very boring.  The students all quickly read off notecards in the front of the room and did not truly express their knowledge of their chosen topic.  To fix this, I’ll alter my speech rubric to have three main elements: content knowledge, engagement, and creativity.  During the presentation, students will need to creatively show the knowledge they’ve learned (such as through audience interaction, music, a video, etc) to engage their audience.  Simply reading a speech in front of the room in a monotone voice will not cut it.

16544885426_05e6b9e931_m
Image Link

The same is true of any maker-style lesson I employ in the future.  For example, if my students are creating something for a project-based learning (PBL) task, the expectation will be that the final product will show the student’s knowledge of the content area as well as evidence that creativity and critical thinking took place.  The process for getting to this end goal will also be assessed.

Students will be assessed through all of the phases of the maker process: brainstorming, prototyping, feedback, and the final product.  The brainstorming phase can be assessed by observing how students work together and build ideas off of each other.  As James Paul Gee (2008) said in a video titled “Grading with Games,” students should work in a group where the “group is smarter than the smartest person in the group.” During the prototype phase, creativity can be assessed evaluating how the students are using the resources provided to them. Gee (2008) states that students should “innovate with the tools [they’ve] learning and not just do standard solutions to problems.”  During the feedback phase, students will be evaluated based on how they respond to feedback to their work by their peers, and make changes to their product.  Finally, students will be evaluated based on the innovation of completed project as well as how this project is presented to others.

arrows-1262403_640.png
Image Link

Students need “to have innovation and creativity” to survive in the workplace (Gee, 2008).  The only way students will gain these skills, and get better at them, is getting specific feedback (Wiggins, 2012).  Therefore, it is essential to evaluate creativity in the classroom.


References

Gee, J. (2008). Grading with Games. Retrieved from https://www.youtube.com/watch?v=JU3pwCD-ey0#t=61

Geralt. “Arrows district evaluation.” Pixabay, 2017, https://pixabay.com/en/arrows-district-evaluation-1262403/. Accessed 13 Aug. 2017.

Geralt. “Presentation.” Pixabay, 2017, https://pixabay.com/p-224107/?no_redirect. Accessed 13 Aug. 2017.

Kuhlmann, Minda H. “Parks and Rec boring buzzer.” Flickr, 2017, https://www.flickr.com/photos/mindahaas/16544885426. Accessed 13 Aug. 2017.

Noorthansen. “Sand Castle.” Pixabay, 2017, https://pixabay.com/en/sand-castle-sand-beach-1308921/. Accessed 13 Aug. 2017.

Wiggins, G. (2012, February 3). On assessing for creativity: yes you can, and yes you should. [Web log comment]. Retrieved from http://grantwiggins.wordpress.com/2012/02/03/on-assessing-for-creativity-yes-you-can-and-yes-you-should/


Makerspace Infographic

Throughout CEP 811, I have learned about the wonders of Makerspace and Maker Education.   Makerspaces are “informal sites for creative production in art, science, and engineering where people of all ages blend digital and physical technologies to explore ideas, learn technical skills, and create new products” (Sheridan, Halverson, Litts, Brahms, Jacobs-Priebe, & Owens, 2014, p. 505).  Makerspaces have been popping up in many locations (such as museums and independent shops) for a wide variety of audiences (from toddlers to adults) (Sheridan et. al., p. 506).   I have even seen Makerspaces locally; the public library near me allows patrons to check-out a Little Bits kit and hosts Little Bits Makersessions for elementary-aged students.


Taller_para_niños_as_de_littleBits,_28_de_febrero_2014,_Espacio_Miscela,_Madrid
Image Link


Even though my local library has embraced Maker culture, I do not know of any school district in my area that has.  For my district in particular, Maker Education seems like a natural next step because we have recently integrated the Next Generation Science Standards, which has a “focus on the importance of design…technology…engineering…and the new media arts standards across the arts disciplines” (Sheridan, et. al., p. 506).  A great way for students to practice these skills is through exploration and creation in a Makerspace.


8426300307_c831911d50_b.jpg
Image Link


An obstacle that would get in the way of the integration of a Makerspace in my school district is a lack of knowledge.  I’m sure many teachers/administrators in my county are unaware of what a Makerspace is and/or the benefits of Maker Education for students.

With this in mind, I decided to create an Infographic tailored towards educators to give them background information about what a Makerspace is and the skills students will learn while engaged in Maker EDU.

For the first part of my infographic, I focused on Mark Hatch’s (2014) “Maker Movement Manifesto” since it clearly describes what Makers do (Halverson & Sheridan, 2014, p. 496).  In the second portion, I emphasized the skills students learn through Maker EDU.  Lastly, I cited evidence from research articles to increase the ethos of the infographic.

I am hopeful that this infographic will help to give teachers an overview of Maker Education, and inspire them to research more and/or begin implementing Makerspaces in their classrooms!

Click here to view an interactive version of the Infographic.  To view a version without the links, see below!

new-piktochart_23775000_c3f64d0fa1111a5df22923c2b2b8e0175f49a31c

References

Cho, Y. H., & Lim, K. Y. (2017). Effectiveness of collaborative learning with 3D virtual worlds. British Journal of Educational Technology, 48(1), 202-211. Retrieved from https://search-proquest-com.proxy2.cl.msu.edu/docview/1895981288?accountid=1259

Daniel, . (2013, January 19). Battling Robots at LA Makerspace. In Flickr. Retrieved August 10, 2017, from https://www.flickr.com/photos/ioj/8426300307

Dougherty, D. (2011, January). We are makers. In TED. Retrieved from https://www.ted.com/talks/dale_dougherty_we_are_makers#t-10615

Genea, J. (2016, August 12). Maker Movement Manifesto-words of inspiration from Mark Hatch. In YouTube. Retrieved from https://www.youtube.com/watch?v=X-qz4Z3wKNM

Halverson, E.R. & Sheridan, K. (2014). The maker movement in education. Harvard Educational Review, 84(4), 495-465.

Hatch, M. (2014). The maker movement manifesto : rules for innovation in the new world of crafters, hackers, and tinkerers. New York: McGraw-Hill Education.

Sheridan, K. Halverson, E.R., Litts, B.K., Brahms, L, Jacobs-Priebe, L., & Owens, T. (2014) Learning in the making: A comparative case-study of three maker spaces. Harvard Educational Review, 84(4), 505-565.

Ultra-lab, . (2016, November 28). File:Taller para niños as de littleBits, 28 de febrero 2014, Espacio Miscela, Madrid.jpg. In Wikimedia Commons. Retrieved August 10, 2017, from https://flickr.com/photos/62141688@N08/12906097445

Failure as a Learning Mode Survey

In our society, failure has a negative connotation in education. No one wants to be part of a failing school, fail an evaluation, or fail an assignment/class. However, “today’s students who are video gamers or athletes know all too well the feeling of defeat that comes with failing to accomplish a goal, and yet they persist in their endeavors” (Vallett, 2014, p. 175). How can this perseverance in the face of failure transfer from games/sports into education? In other words, how can failure be used as a learning mode in the classroom?

This concept of failure as a learning mode is the Wicked problem that my group is analyzing in CEP 812.  We have been researching this topic for several weeks and believe we can come up with some viable solutions.

We have determined that in order for failure to be used as a learning mode, students need to feel safe to take risks and fail. This can be done through “productive failure” in the classroom. Productive failure is a “learning design that affords students opportunities to generate representations and solutions to a novel problem that targets a concept they have not learned yet, followed by consolidation and knowledge assembly where they learn the targeted concept” (Kapur, 2015, p. 52). In other words, students are given the chance to try something new and fail before learning a method for success. For this method to be successful, however, there are many variables that need to be in place in the classroom.

To help in my group’s research, please consider taking this survey.  To qualify to take this survey, you must work in an educational setting. The survey contains 16 questions and should take 5 minutes or less to complete.

Your responses are anonymous. You may choose to skip any questions you do not want to answer. You may choose to stop taking this survey at any time. Data from this survey will be used only for the purposes of an assignment from the CEP 812 course at Michigan State University.

Please complete this survey by 11:59 pm EST on Tuesday, August 8, 2017.  Thank you for your assistance in solving this Wicked problem!


References:

Kapur, M (2015). The Preparatory effects of problem solving versus problem posing on learning from instruction. Learning and Instruction, 39, 23-31.

Vallett, D. B., & Annetta, L. (2014). Re-visioning K-12 education: Learning through failure—Not social promotion. Psychology of Popular Media Culture, 3(3), 174-188. doi:http://dx.doi.org.proxy2.cl.msu.edu/10.1037/a0033651


Experience Design in the Classroom

In my first year of teaching, I was given the freedom to design my own classroom (with a set of school-provided desks).  Since I was lacking experience, I decided to stick with the seating design I experienced as a high school student – rows.

classroom-2093744_640
Image Link

This desk arrangement was not effective because the classroom design was not conducive to collaboration.  Considering I ask students to discuss ideas with group mates several times in a class period, the rigid rows created a major issue.  In addition, Sir Ken Robinson, in an interview for The Third Teacher (2010) argues that the rows give off “a very strong sense of conformity” that tells the students that this room is a place where “Teachers teach and students learn.” Since I want my students to be Makers, not passive learners, I knew I needed to change my classroom design to match my teaching philosophy.


After my first semester of teaching, I changed my classroom design a few more times until I settled on a grouping design I still use today (pictured below).

20170801_12541220170731_074956
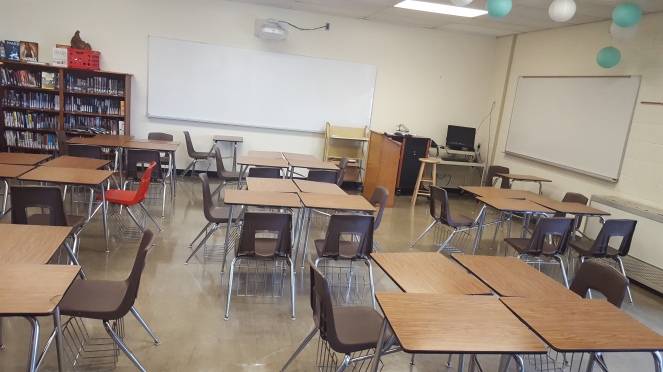
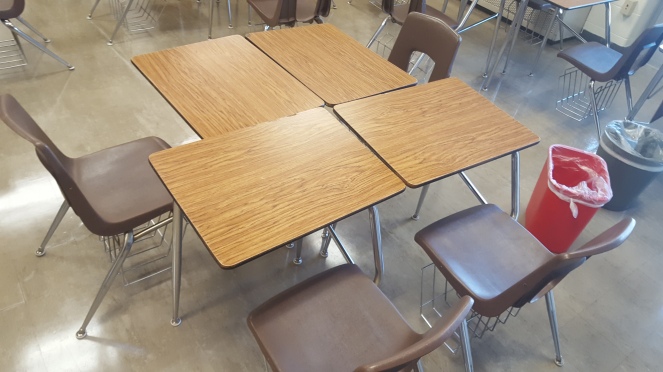
My students are set up in 7 different “pods” around the classroom, which makes it easier for students to work together in groups.  There are some difficulties with the design, however, based on the limitations of the desks.  The desk on the far-right, for example, is difficult for students to get in and out of because they have to squeeze between the two desks.

20170801_123458

My classroom design space is fairly limited. Due to the middle school and high school combining into one building, many classrooms (including mine) have divided into two separate rooms.  There were other limitations that I had to work around as well (such as my ever-growing classroom library taking up a large portion of my room, needing Principal’s permission to make drastic changes, and all alterations being paid out-of-pocket).

20170801_123529

However, even with these limitations, I knew I could come up with a better design for my classroom.  Below are conceptual designs I made of my ideal classroom using SketchUp.

FocusViewSideView

The first choice I made was changing the wall color.  My classroom’s walls are currently a drab white.  Barrett, Zhang, Moffat, and Kobbacy (2013) mention that with older students, warm colors seem to support better learning (p. 688).  Since I teach mostly upperclassmen, I decided to go with a warm red color.  The authors (2013) also mention that natural light is another positive feature of the classroom (p. 688).  I currently use Chinese Lanterns in my room (which the students and I both love!) and integrated them into my SketchUp design as well.

20170801_123439Ful_View_1

The most significant change in my classroom, however, is the change from desks to flexible seating.  This is a change I have been considering for a while because it will give my students more freedom to collaborate as well as select a learning area that works best for them (whether that be a table, the floor, a standing desk, etc).  The design shows an emphasis on student-centered learning instead of teacher-centered.  As Cho and Lim (2017) mention “interactive learning with peers is more effective for knowledge gains than passive learning” (p. 203).  Since I want to move towards project-based learning, this will give my students multiple seating arrangements (that can easily be rearranged as needed) to use with their groups to collaborate and create.

FocusView2

If I were to buy all of the furniture items brand new, this design would be very pricey.Table
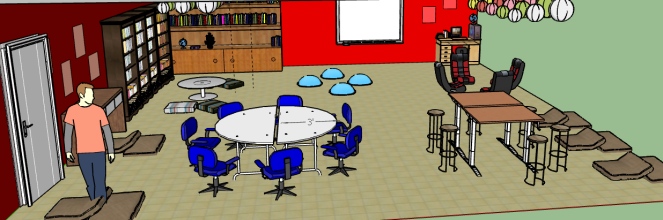
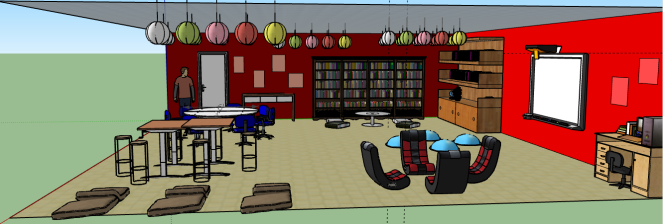
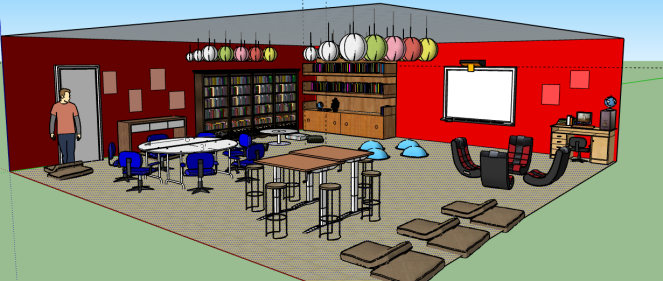
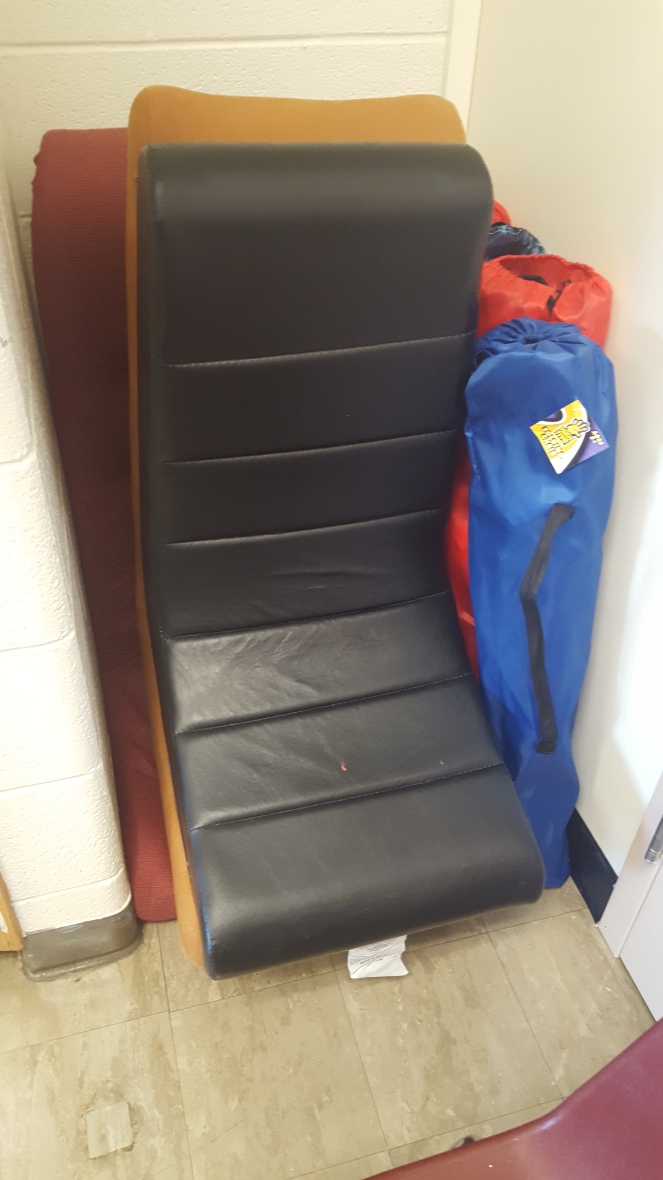
Although $2,705 is an egregious amount, I know of teachers who have decreased this cost immensely through garage sales.  For example, I bought three game chairs this summer that ranged from $10-$15 each and 5 foldable chairs for $5 each.

20170801_123541

I think my flexible classroom design is possible through patience and smart shopping.  I am planning on integrating furniture items slowly into the classroom based on items I find.  For example, I will be integrating the game chairs as an option for student seating during choice reading time.  Towards the end of my project, however, I would like to spend a long weekend organizing all of my furniture items to help make the room feel cohesive.  For now, though, I will continue to keep my eye out for sales to make my dream classroom a reality!

References

Barrett, P., Zhang, Y., Moffat, J., & Kobbacy, K. (2013). A holistic, multi-level analysis identifying the impact of classroom design on on pupils’ learning. Building and Environment, 59, 678-689. doi: http://dx.doi.org/10.1016/j.buildenv.2012.09.016

Cho, Y. H., & Lim, K. Y. (2017). Effectiveness of collaborative learning with 3D virtual worlds. British Journal of Educational Technology, 48(1), 202-211. Retrieved from https://search-proquest-com.proxy2.cl.msu.edu/docview/1895981288?accountid=12598

OWP/P Architects, VS Furniture, & Bruce Mau Design. (2010). The third teacher: 79 ways you can use design to transform teaching & learning. Retrieved from http://thethirdteacherplus.com/s/Ch2-TTT-for-Web-0y6k.pdf

Wokandapix, . (n.d.). Classroom School Education Learning. In Pixabay. Retrieved August 1, 2017, from https://pixabay.com/en/classroom-school-education-learning-2093744/


Failure as a Learning Mode Infographic


During a Zoom meeting, my group continued to dig deep into our Wicked problem (Failure as a Learning Mode).  Through our discussion, we discovered new reasons why our problem is so Wicked.  We started off thinking of failure just in terms of student learning (such as students receiving a failing grade or failing a class).  However, there are many other people in schools affected by failure, such as teachers (through perceived failed lessons and/or failed evaluations) and the school itself (through low standardized testing scores).  With these ideas in mind, our group came up with five questions to focus on:

  1. Why are teachers influenced by fear of failure, in both their work and their students’ work?
  2. Why are curriculum standards causing students to fail?
  3. Why can’t failure be interpreted as learning positively?
  4. Why does failure motivate some students and discourage others?
  5. Why are students not afraid to fail in some elements of their lives (such as sports or video games) but are afraid to fail in the classroom?

To encapsulate the big ideas from the group discussion, I created an infographic (using Canva) that represents our major questions and some research to give some background on why students (as well as teachers) have a fear of failure.

To view the references in the infographic, either click here or click on the infographic itself.

To view a larger version of the infographic, click here.

As our group begins analyzing solutions to our Wicked problem next week, we will have to be mindful of the complexity of our topic and think of the impact of failure on students, teachers, the school itself, and other stakeholders.

Maker Lesson Plan

I’ll admit it: I’m a bit of a control freak when I lesson plan.  When I leave sub plans I am so obsessive that I give a minute-by-minute rundown of everything that should be happening during the hour.

So, when I started to create a Maker lesson plan, it was difficult to change my mindset.  I felt the urge to give my students specific outlines and a play-by-play of how to complete their projects.  My original plan was for every group to have a Makey Makey kit and do a similar activity (like Scratch) with it.  Thankfully, however, I went to a conference this week where I saw Steve Dembo (@teach42) give a keynote.  He actually brought up the topic of Makey Makey kits and how teachers are actually limiting students creativity by over-structuring student’s exploration.  Dembo (2017) said something that changed my outlook on this lesson plan: “expecting students to do the same thing is a recipe, not a project.”

I realized mid-way through the week that my lesson plan was just that: a recipe.  If I wanted students to truly be Makers and experience true collaborative problem solving, I needed to be more hands-off and let students figure things out for themselves.  I could structure the specific elements of the lesson plan (like the design process) but should be vaguer in the project creation process to allow for more creativity and flexibility.

Many elements of this lesson plan scare me because of the unknowns.  How will the students do during the debate?  Will workable groups be formed?  What will the students create?  Am I being too vague with my plans?  Will the students be successful?  These are just some of my worries.  However, I think that is part of the beauty of a Maker lesson: the teacher does not have to have all of the answers.  The students will create their own meaning and surpass all of my wildest expectations.

To read my full lesson plan, as well as a rationale for my choices, click here.


Reference

Dembo, S. (2017, July 24). Building Bolder Schools. Speech presented at Lake Michigan Technology Conference in Coloma, Michigan.

Popping my Filter Bubble

In my daily life, there are three ways I gain information: Facebook, Twitter, and YouTube videos. Before watching Eli Pariser’s (2011) Ted Talk, I had not realized the extent of how the content I viewed on these social media platforms was being filtered.


Image1
Image Link


Near the beginning of the Ted Talk, Pariser (2011) discussed how he discovered that he was not seeing all of his friend’s posts on Facebook.  He states that “Facebook was noticing what links I clicked on…and without consulting me about it, it had edited them out.  They disappeared” (Pariser, 2011).  This was something I had noticed on my feed as well (since there are old acquaintances from high school that I never see posts from) but was never especially troubled by (since I was probably only missing more cat videos and food pictures).  Something that does concern me, however, is how this filter is being integrated into other platforms like Google.


Image2
Image Link


Pariser (2011) reveals that “there is no standard Google anymore” since different results pop up for different users based on a person’s previous search history.  This was troubling to me since I always assumed that everyone had equal access to the same information in the same search.  Pariser (2011) explains the crux of this problem when he says that “the internet is showing us what it thinks we want to see, but not necessarily what we need to see.”  All of this leads to what Pariser (2011) describes as a “filter bubble” where we unknowingly are trapped in a loop of information targeted for us and do not see (or even know about) any of the information left out.

This perpetuates the problem known as confirmation bias. James Paul Gee (2013) in his book The Anti-Education Era: Creating Smarter Students Through Digital Learning states that “because of this bias, people seek out and remember information that supports their beliefs, and ignore information that does not” (p. 2).  The filter bubble puts us in a permanent state of confirmation bias: we literally only see information that supports our opinion, feel validated, and never seek out information that would disprove what we believe.


Image3
Image Link


Sadly, I believe I personally have been caught up in a filter bubble.  My facebook account is a personal page full of my real-life friends that (mostly) have similar views.  Any that do not, I’m sure, have been “hidden” from my feed.  On my professional Twitter account, I have purposefully followed many fellow teachers/educators.  However, this has most likely just increased my confirmation bias since these people generally share the same interests and views as me.  I perpetuate this cycle by retweeting ideas by others that I agree with and feel validated when others retweet/like my own thoughts.

To help improve my “diet” I have decided to add some “veggies” (more informational news sites) rather than just relying on my facebook feed for information.  I updated my RSS with many different news sites to gain different perspectives on news issues.

The_Old_Reader_Image.png
Image from my RSS feed (The Old Reader)

On Twitter, I am planning to follow more diverse people that share different perspectives about different issues compared to my current following.

Besides gaining more diverse information personally, I knew I needed to expand my knowledge on professional issues as well, especially as I continue to do research towards my group’s Wicked problem.  I went through Twitter and found many different perspectives on my group’s issue (failure as a learning mode) as well as another topic of interest (standardized testing).  The results of my findings can be found in this storify.

As I continue, personally and professionally, to seek out information online, I will be sure to keep my filter bubble in mind, and my confirmation bias in check.

References

Gee, J. P. (2013). The anti-education era: Creating smarter students through digital learning. New York: Palgrave Macmillan.

Pariser, E. (2011, March). Beware online “filter bubbles”. Retrieved July 21, 2017, from https://www.ted.com/talks/eli_pariser_beware_online_filter_bubbles